Monday, November 23, 2009

Team Swaps


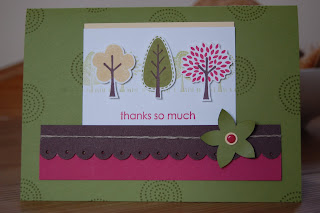
Here is the swap I made for the Demo Team Meeting last Saturday.  I used Kraft as my base and inked the spiral tree in White Kraft Ink onto it.  I used the Scallop Edge Punch to create a border at the bottom and pierced holes in each scallop using the Piercing tool.  I stamped 3 tall trees from "Trendy Trees" in Old Olive and Chocolate Chip, hand cut them and used Dimensionals to adhere them to a piece of Rose Red Designer Series Paper which was matted with a layer of Chocolate Chip and Old Olive.  My greeting is from "Sincere Salutations" which I stamped onto a piece of Kraft cardstock and layered with Old Olive and Chocolate Chip, piercing the ends for extra texture using the Mat Pack.  I drew around one of the Die Cut blooms and layered two together and used the 1/4" and 1/2" circle punches along with an Old Olive Brad to centre the flower.  I adhered the flower with a Mini Glue Dot onto a thin strip of Chocolate Chip cardstock at the top of the card base.

Don't forget about the Gift Giving Guide offer that is still available, spend £45 on products from the Guide and receive a free, yes FREE Tag Punch worth £12.50.  Email me for details.

Sunday, November 22, 2009


Yesterday I attended the "Inkaholics" Demo's meeting and here are a couple of swaps I received from Rosie and Jane.  We had a lovely time chatting and stamping and couldn't really believe where the time went!!

Thank you Rosie for having us along to your wonderful Studio!

It is my birthday today so have been spending some time with my family, did managed to squeeze in a little shopping trip though!  My wonderful other half is taking me to London on Tuesday for a visit to Tiffany's for a birthday treat so really looking forward to that!


Friday, November 20, 2009


Just a quick post today to show you a card that I demonstrated last night at a workshop I held.  I used So Saffron, Chocolate Chip and Creamy Caramel, a lovely combination of colours along with the "Circle Circus" and "Oval Alls" stamp sets.  I used the Scallop Edge punch to create a border to the left side of my card and pierced the Creamy Caramel strip of card using the Mat Pack.  I attached a piece of 1/2" "So Saffron" Striped Grosgrain which I knotted for extra texture.  My first layer was created using a piece of the So Saffron Designer Series Paper, which I then layer with Whisper White cardstock that cased my stamped images.  The greeting was stamped using the Oval Alls set and cut using the co-ordinating Scallop Oval and Plain Scallop punches.  To give the card depth I inked the edges of my mat layers with Chocolate Chip ink using a dauber.  I also cut some flower elements from my stamped images and backed them with dimensionals to give them height and added a flat backed pearl from the Pretties Kit.

Tuesday, November 17, 2009

Circle, Circles!


Circles, Circles everywhere, I just love the "Circle Circus" set, not that you hadn't noticed!!  Here I have used Rose Red and Chocolate Chip inks and cardstock, these two colours work really well together and I threw in a strip of Kraft to break it up!  I used the Stamp-a-ma-jig for correct placement of my greeting which is from the "Sincere Salutations" set.  

Thanks for dropping by!

Sunday, November 15, 2009

3D Stamp Class


So here is what I came up with for the 3D Stamp Class I held on Thursday.  I saw the idea on SCS and designed my own template for a box and some co-ordinating gift tags.  I was pleased with the end result after several attempts at getting the measurements of the box correct!!  We used Kraft cardstock as the box base and inked it with the Jumbo Handle and "So Swirly" wheel in Not Quite Navy Ink.  The tags were created using Very Vanilla cardstock along with "Bella Bleu" Designer Series Paper and the wonderful "Circle Circus" stamps.  I hope you ladies enjoyed your evening, I certainly did, thanks for coming along.


Friday, November 13, 2009


Another request by a friend so I thought I would use the 3D technique again with the "Circle Circus" set.  I printed my greeting onto Very Vanilla cardstock and cut out with the Oval Punch, then layered this onto a Not Quite Navy Scallop Oval punch out. The background stamp "bubbles" (that is my name for this one!) is also from "Circle Circus" inked with Not Quite Navy to match the rest of the card.  I used a piece of 5/8" Grosgrain Chocolate Chip Ribbon vertically behind the 3D Scallop Circle image to add texture and also punched 3 circles in Not Quite Navy using the 1/4" Punch then layered with 3 tiny circles cut using the handheld 1/8" Circle Punch.  I inked all the edges of the Very Vanilla cardstock using a dauber to add depth.

Tuesday, November 10, 2009

18th Card


I was asked to make an 18th card by a friend and here is the end result.  She asked for pink so I decided to use Rose Red teamed with Chocolate Chip and a smidge of Kraft.  I have used the large stamp from "Circle Circus" and cut elements from it and raised them with Dimensionals.  I added a flat back pearl to centre one of the raised flowers which were stamped in Rose Red ink.  I printed my greeting as a name was requested and die cut the number 18.  I added a piece of knotted 1/4" Grosgrain ribbon to my greeting panel and pierced holes at the edge using the Mat Pack.  Simple but sweet!

Stamp Camp Class


Here is a sneaky peak of the boxed set of gift tags, the 3D project we will be creating at my Stamp Camp Class this Thursday, 12th November 2009 at my house.  Cost of the class is £4.50, all you need to provide is adhesive.  Class starts at 7.00pm through to 9.30pm.

If you would like to book in please let me know asap as places are limited.

Thanks, Kerry x

Sunday, November 8, 2009

Christmas is Coming!


I have been making some mini cards recently and here is a Christmas Envelope Card I made using the lovely "Season of Joy" stamp set.  I have used the Merry Moments Designer Series Paper along with Old Olive and Whisper White cardstock.  I stamped the Poinsettia in Real Read ink, hand cut it and finished with a brad, adhering with a Dimensional to make it look more 3D.  Using the Stamp-a-ma-jig I positioned my greeting just where I wanted it and finished the card off with a piece of Real Red 5/8" ribbon which I tied at the front with a knot.

Thanks for stopping by!

Friday, November 6, 2009

Tree Trio


We created this card at the workshop on Monday which was inspired by a very similar one in the Stampin' Up! 2009/10 Idea Book & Catalogue.  It was quite a challenge using 3 colours with so many of us but we got there in the end!

I just love Rose Red and Old Olive together, a really lovely combination.  We added a Chocolate Chip border cut with the scallop edge punch and a flower embellishment along with some linen thread.  We traced around a die cut bloom and hand cut the flower shape adding a brad to the centre.  We used the Standard Stampin' Around Handle along with the "Funky Forest" wheel to use as a background for our main images.  The greeting is also from the "Trendy Trees" set.

Thursday, November 5, 2009

Thank You's


I needed to make some Thank You cards so here is what I came up with.  I am so loving the "Circle Circus" set at the moment so I decided to use it on some small 3x3 cards.  My card base is Basic Grey, topped with a strip of Rose Red Designer Series Paper and Cardstock which I pierced using the Mat Pack.  The circle images are from the "Circle Circus" set and the greeting from the "Trendy Trees" set which is so cute!  I stamped the images in Rose Red onto Whisper White card then matted it onto Basic Black cardstock.  Quite simple but really quick and cute!

I am offering some Ribbon and Designer Series Paper shares so will post all the details tomorrow.

Tuesday, November 3, 2009

Stampin' Card Workshop No. 1


My first monthly Stampin' Card Workshop was yesterday and this is how it all began, thank goodness I was too busy to take any other pictures as by the end of the night it was not a pretty sight, but well worth all the effort.  I really enjoyed it and I hope all those of you who attended enjoyed yourselves too!!

The winner of the Door Prize Draw was Louise, well done, I will be in touch to deliver your prize!

Monday, November 2, 2009

Sneaky Peak


Just a sneaky peak of something I am making for my ladies attending tonight's workshop, a little inspiration for them to take away with them at the end of the evening!

Sunday, November 1, 2009

A Great New Offer!


From 1st November through to 29th December, when you spend £45 on products from the above Gift Giving Guide, you will receive a FREE, yes FREE Tag or Small Tag Punch (worth £12.50).

Here is the list of all qualifying products and the corresponding catalogue page numbers:-

Flower Power Simply Sent Card Elements - Page 77
Wow Flowers Stamp Set - Page 77
Rock Star Simply Sent Card Elements - Page 77
Starring You Stamp Set - Page 77
Fresh-Cut Notes - Page 80
Fresh Cuts Stamp Set - Page 53
Cutter Kit - Page 90
Latte Designer Buttons - Page 83
Playground Designer Buttons - Page 83
Medium Flat Cellophane Bags - Page 80
Spotlight on Christmas Stamp Set - Page 22
Old Olive A4 Card Stock - Page 72
Whisper White A4 Card Stock - Page 71
Real Red 5/8" Grosgrain Ribbon - Page 87
Christmas Jingle Simply Scrappin' Kit - Page 79
Real Red A4 Card Stock - Page 72
Old Olive 5/8" Grosgrain Ribbon - Page 87
Petal Party Simply Scrappin' Kit - Page 79
Sunny Day Simply Scrappin' Kit - Page 78
Love Stories Simply Scrappin' Kit - Page 79
Circle Circus Stamp Set - Page 55
Bold Brights Stampin' Write Markers - Page 72
Bold Brights A4 Card Stock - Page 72
On Board 12.7x12.7cm Art Journal - Page 82
Spiral Punch - Page 88

If you are interested in purchasing anything from the Gift Giving Guide please contact me on stampinkerry@aol.com or 07717 068909

Thanks for stopping by!