Friday, April 30, 2010

Scrapbook Class Layout No. 2

So here is the second layout, this would work as a double layout with the first one, very similar colours and my photo's are from the same "Photo Shoot" but I have created them as separate layouts.  I have used two 6x4" Landscape photographs for this one.
Once again, this could easily be re-created as a masculine page as the colours are quite neutral, just remove the flowers and add stamped images of your choice.  The DSP is from "Tea Party" and most of the papers in this pack are quite soft subtle colours but there are a couple, including this one that have a touch of Basic Gray, just a very fine line running through hence the matching cardstock.  I used "Circle Circus" to stamp onto the circles at the bottom of the layout. 

Just need to add some journalling now and I have left the space behind the photos "unstuck" so that I can slip a piece of cardstock behind, add a tab then it can be pulled up and down to view.  I love to journal on my layouts, I feel it is an important part of scrapbooking, but sometimes I like to "hide" the journalling as it may spoil the look of a layout or there just might not be room for it!

Thursday, April 29, 2010

Scrapbooking Class

Yay, blogger is behaving this morning, so here is the first layout for the next Scrapbooking Class. Apologies for the poor picture quality, I had to re-take the photographs and the light isn't so good this morning.
My photographs are:

One 7x5" Landscape and Three 3x2.5" Landscape

BUT

One 7x5" or 6x4" Landscape and One 6x4" Portrait would work just as well.

We are using the lovely "Vintage Vogue" stamps but if you would prefer to make this a more masculine page, I have other stamps that would suit in its place.

Vintage Vogue Pizza Box

I have been planning on running some extra classes to make 3D projects but never got any further than trying to sort out dates that were convenient for those wanting to attend so last week we agreed on a date and I set to work planning the project.  Originally I had set aside several Saturday's for extra classes but found that most people already had family commitments so if any of you local ladies have something in mind you would like to do, just give me a shout and I can organise an evening to suit!

Anyway, onto last night's creation.  The request for last night was a Pizza style box that contained mini cards and a Pop Up Treat Holder!  As I am loving "Vintage Vogue" so much I had to sneak it onto these projects so spent Sunday (in the motorhome between my son's races) planning the box and contents.  The colours I chose are of course my favourites at present, Old Olive, Rose Red and Chocolate Chip, what a combination!
Here is a close up:
We used "Vintage Vogue" for the flowers and foliage then the greetings are from "Sincere Salutations" and made four cards all in different colour combinations with different greetings on.  We also stamped inside on the inserts.

The Pop Up Treat Holder is quite quick and easy to create, just as well, as we were running over time (nothing unusual there!).  Once again, using the same stamps as for the Pizza Box, we stamped the foliage all over the Rose Red Card to create a background then layered strips of Chocolate Chip, Old Olive and Very Vanilla accross the middle of the holder and ahdered at the back.  Our flowers were stamped and hand cut, a Rhinestone Brad attached and then Dimensionals to layer and adhere to the holder.  The 1/4" Grosgrain Ribbon is just perfect for this project and when you pull up on the bow, the hidden treat is revealed!


If you would like to come along for an evening of stamping, chatting and fun, just email me or give me a call for further details.  I am available for classes during the day and also offer one-to-one crafting sessions.

Thank you for stopping by, and thank you to those lovely ladies who came along last night to create these projects, I hope you had fun!

Wednesday, April 28, 2010

HELP!!!

I am not sure what is going on but I have been sat here for ages trying to upload some layouts and for some strange reason my photographs are coming up rotated 90 degrees to the left.  For a while blogger changed the way images were uploaded but now it appears to have "changed back", but I am still not able to upload a photograph without it rotating.

Is anyone else having the same problem or is Blogger just not liking me this evening???

Tuesday, April 27, 2010

Tiny Hello's!

Yet again the "Two-step Bird Punch" is out in force, along with "Tiny Tags" and in this case, the tiny "Hello" stamp.

My colours are Not Quite Navy, Barely Banana and Old Olive inspired by the Designer Series Paper I chose from the new Sweet Pea Stack.  My bird was punched from Close to Cocoa cardstock and versamarked using the foliage stamp from "Vintage Vogue".  I stamped the tiny "hello" greeting in Chocolate Chip onto Barely Banana cardstock and punched out using the Medium Jewelry Tag punch, tying a bow with Linen Thread.  I added a piece of So Saffron 5/8" Grosgrain ribbon for some texture.

Click on the picture for a closer view to see more detail.

If you would like to order any products from the current Stampin' Up! Catalogue or new Mini Catalogue, just email me at stampinkerry@aol.com and if you have a Paypal account you can pay using your Credit/Debit Card and have your order shipped direct to your door!  Cheques are also welcome!

Back tomorrow with details of the 3D Class that I held last night.

Monday, April 26, 2010

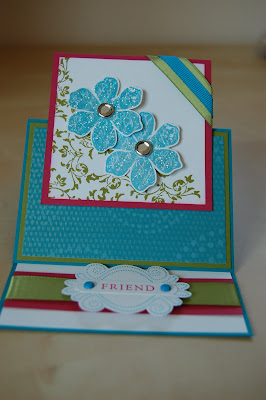
Easel Card


I love making Easel Cards, they are so simple yet have that WOW factor.
For this sample I used the lovely "Vintage Vogue" Flower and Foliage stamps.  My flowers were stamped in "Tempting Turquoise" and I used the Heat & Stick Powder along with the Dazzling Diamonds Glitter to create a wonderful sparkle to them.  I added Rhinestone Brads to the centres to add to the bling!
I stamped the fern image randomly over the Whisper White panel using Old Olive ink and then adhered my sparkly flowers on top.  My greeting was from "Basic Phrases", punched out using the Word Window Punch and then adhered with brads to a stamped image from "Frames with a Flourish" which I stamped and hand cut.  I used some of the new 5/8" Old Olive Satin Ribbon on the top right corner of the card and also on the base underneath the greeting.  The patterned paper is from the new Sweet Pea 12x12" stack.


Sunday, April 25, 2010

April Card Making Class

Following on from yesterday's post, here is the second card we made at the last card making class.

We used the lovely "Vintage Vogue" set along with the "Rock 'n' Roll" technique.  The colours were Barely Banana for the base, teamed with Rose Red and Pretty in Pink.  At this point I would like to say a huge thankyou to Amanda for lending us her "Pretty in Pink" ink pad as I had brought "Regal Rose" by mistake (drrrr) and luckily Amanda had ordered PIP and I had taken the order along with me to give her, so thank you for saving the day Amanda!

Using the Rock 'n' Roll technique, we stamped our flowers in Pretty in Pink & Rose Red, hand cut them and arranged over our panels, adding leaf stems punched from the "Two-step Bird Punch".  The middle Barely Banana panel was stamped with Versa Mark using the Vine stamp from Vintage Vogue and we then stamped "friends" from the Tiny Tags set and punched using the co-ordinating Medium Jewelry Punch, tying with Silver Elastic Cord in a bow (which is quite tricky by the way but worth the effort!).  Our greeting was stamped in Rose Red at the bottom of the card.

If you would like information about any of my classes, please contact me on stampinkerry@aol.com for further details.

Saturday, April 24, 2010

Card Making Class - Man Card!

At March's monthly card class I promised everyone that in April's class we would make a "Man Card", so here it is!
We used "Cheers to You", a great set suitable for both male and female cards and celebrations too.

I chose Chocolate Chip, Old Olive and Really Rust which work well together and teamed with Whisper White cardstock.  The middle Beer Jug is hand cut separating the froth part and covering with the new "Frost White" Shimmer Paint then using a dauber on the bottom glass piece to cover in Really Rust, adding a soft layer all over then heavily daubering around the edges with the same colour. Click on the picture to enlarge the image for a closer view.

The greeting was stamped in Really Rust and punched out using the 1" Circle Punch then layered onto a decorative circle from "Frames with a Flourish" then punched out with the 1 3/8" Circle Punch.  The ribbon is the new Old Olive Satin 5/8" from the mini catalogue.

Here is another version where I added some Not Quite Navy.

Thursday, April 22, 2010

Wedding Time

I have been experimenting with some wedding cards recently and here is one that I came up with, nothing too fancy, just pretty, but simple.

I used "I {heart} hearts" for this one which can be found in the new Mini Catalogue on Page 7, a gorgeous set comprising of 8 stamps, of which some co-ordinate with current Stampin' Up! Punches.

I stamped the hearts using Rose Red and Pretty in Pink, hand cut 3 of them and punched out the smaller one to the right, then just adhered  them to the Very Vanilla card using Dimensionals.  My base card is Kraft and these colours look great together. 

I used the "Mr & Mrs" stamp from "Tiny Tags" and punched it out using the new style "Jewelry Tag" punch along with a plain tag in Pretty in Pink and then punched a hole at the top and tied with Linen Thread.  I added some Taffeta Ribbon in Pretty in Pink and three flat back pearls to finish.


I was really pleased with the finished result and intend on making more "simple but sweet" cards in the future.

Wednesday, April 21, 2010

Thanking You

A couple of weeks ago I made these thank you cards using "Vintage Vogue" and the new A La Carte stamp "Elegant Thank You".  I used Rose Red, Pretty in Pink Certainly Celery and So Saffron cardstock in different combinations and teamed them with Whisper White.  The flower stamps from "Vintage Vogue" are just gorgeous and look lovely layered upon each other.  I added a Rhinestone Brad to the centre of each flower.  I attached borders along the bottom of each card punched using the Eyelet Border Punch which is really pretty. 
I stamped my greeting using "Elegant Thank You" which is sold as a single stamp onto my card, then re-stamped onto another piece of Whisper White and punched out the wording using the Word Window Punch, then layered with a Dimensional on top of my original stamped image.

If you are interested in purchasing any of the products that I have used to make these cards, please email me at stampinkerry@aol.com for further information.

Thanks for dropping by!

Tuesday, April 20, 2010

So Tweet!


As you can probably tell I am loving the new "Two-step Bird Punch", its just so tweet!!  I have stamped onto Certainly Celery cardstock with the new "Dot, Dot, Dot" background stamp in the same colour and then punched out my bird.  I added droplets of Crystal Effects to the dots on his wing.  The Designer Series Papers I used were from the "Tea Party" pack which inspired me with my colour scheme for the card.  The greeting is stamped using the "Thanks So Much" stamp from the newly released "Tiny Tags" set and punched out using the new Jewelry Tag Punch which co-ordinates with it, then I tied a piece of Linen Thread in a bow to finish.  The wording at the bottom of the card is from "Vintage Vogue".  I also added some "Frost White Shimmer Paint" to the Old Olive branch which was cut using the "Two-step Bird Punch".

Monday, April 19, 2010

Animal Stack

My card today uses 3 of the wonderful animals from "Fox & Friends".  I stacked them on top of each other using the Stamp-a-ma-jig for easy placement.  My choice of colours Chocolate Chip, Not Quite Navy, Old Olive and Barely Banana were chosen to co-ordinate with the piece of patterned paper on the bottom layer which is from the new 12x12" Designer Series Paper Pack which is so yummy!  You get 48 sheets of 12x12" patterned paper in this stack, all for £19.50 which is a fantastic price, and to add to that they are all double sided too!  These papers also co-ordinate with some of the new products in the Mini Catalogue.

My greeting is from "Basic Phrases" which has been getting a lot of use recently, I love that these phrases fit lovely inside the Word Window Punch.  The monkey is holding a branch which has been cut from the new "Two-step Bird Punch" and trimmed down to size.  I have also used some leftover DSP from the "Tall Tales" range and layered with Barely Banana cardstock.  My circles at the bottom of the card are punched using the 1/4" and 1/8" circle punches.

Saturday, April 17, 2010

Pink Flamingo vs Vintage Vogue!

I have been making some cards recently using papers from the Deisgner Series Paper Share that I had a short while ago.  Each pack contained 54 sheets of 6x6" papers, one design from 9 different packs and they are just perfect for card making.  Each piece is double sided giving you even more choice!  I will be running another Paper Share soon so check back for details.  I saw a sketch using 3 panels of cardstock as a background and decided to give it a go with patterned papers and even though this paper is quite bold, I don't think it overpowers my stamped layer too drastically.

For this card I used papers from the "Pink Flamingo" set and stamped my flowers from "Vintage Vogue" in Real Red to match.  The greeting and leaves stamps are also from the same set.

If you are interested in taking part in one of my Paper Shares, drop me a message at stampinkerry@aol.com and i will forward details to you.

Thanks for stopping by

Friday, April 16, 2010

I have been busy in my craft room lately playing with the new products from the Mini Catalgoue which are just fab and this was a card I created using the new set "I {heart} Hearts".  The trio heart stamp in this set co-ordinates with the "Heart to Heart" Punch making easy work and saving the cutting out time!

The background was stamped using Versamark with the Spotty Heart stamp and the main heart images were stamped in Rose Red, Pretty in Pink and Old Olive.  I added one of the "Playground" Designer Buttons to one of the hearts tied with a bow using the Linen Thread then adhered with a Glue Dot.  To finish I tied a piece of co-ordinating Taffeta Ribbon around my top layer to add some texture.

Thursday, April 15, 2010

Just hanging around!

This monkey stamp from "Fox & Friends" stamp set is just soooo cute, along with his 6 other friends that complete the set.  This is just fab for a young boy card and I am sure there are lots of cheeky little monkies out there that this card would suit perfectly!

The branches were cut using the new Two-step Bird Punch and I stamped the monkey two extra times and cut out the head and raised using Dimensionals.  I used a piece of the new 5/8" Satin Ribbon in Old Olive to tie a knot around one of the layers, this ribbon is just so nice for tying bows and knots as it is so soft and smooth!  My title was stamped using the "Basic Phrases" stamp set and punched out using the Word Window Punch.  I added Crystal Effects to the three 1/4" circles to the left.

The patterend papers I used were from the "Tall Tales" Designer Series Paper pack.


Wednesday, April 14, 2010


The new Two-step Bird Punch is just so cute, I have been getting plenty of use out of it already!  I stamped the new "Dot, Dot, Dot" background stamp onto my punched out bird in the same colour as the cardstock to give a tone on tone effect and then daubered around the edges and adhered the wings.  Using the punch again I punched out an Old Olive branch for the bird to sit on!

The patterned paper is from the "Tea Party" Designer Series Pack and I have added punched out circles using the 1 1/4 and 1" punches, cutting the smallest first to end up with a ring.  My Old Olive flower is from the Flower Fusion Accents & Elements collection, a really lovely tin full of felt flowers which you can find on Page 83 of the 2009/10 Idea Book and Catalogue.  Next to this I added two buttons tied with Linen Thread and adhered an Old Olive button on top of the felt flower.  I tied a piece of 1/4" Chocolate Chip Grosgrain ribbon around my main panel and stamped my greeting from the "Basic Phrases" set and punched out using the Word Window Punch.

Tuesday, April 13, 2010

Soft and Subtle

This is the make and take card we made last night at my mini catalogue launch.  I really love these soft and subtle colours, so feminine and pretty.  We used Pretty in Pink cardstock for our base and teamed it with Certainly Celery and Very Vanilla with a hint of Old Olive.  Our stamps were from "Vintage Vogue" which I am really loving at the moment and we also used one of the new background stamps "Dot, Dot, Dot" which is fab.  We used the new "Two-step Bird Punch" to punch out our bird and branch, inking around the edges using the Daubers.  We handcut the large flower image and used a Dimensional to raise it from the background.


We created a faux button using the 3/4" and 1/2" Circle Punches and tied around a piece of 1/4" Very Vanilla Grosgrain ribbon in a knot.  We used the Mat Pack along with the Paper Piercing tool to create pierced holes for decoration.

Monday, April 12, 2010

Open Evening Tonight

You are all welcome to come along to my Open Evening tonight to celebrate the release of the new Mini Catalogue.  Here are the details:

Whitminster Village Hall
(1 mile from J13 of M5)

7.00 - 9.30pm

Drop by for coffee, create a Make & Take card using some of the new products, view samples created using the new products and get to view the new Mini Catalogue and also the 2009/10 Idea Book & Catalgoue.  I will be available to offer any advice and will have information available for Home Workshop bookings and also the classes that I run.

There will be a raffle too so don't miss out, come along for a little social evening, meet other card makers and just be inspired!


Here's a little sneak peak for you:


Hope to see you there!

Man Card Challenge!


Myself, Caroline and Georgina decided to set ourselves a little challenge.  Each of us had to come up with a design for a "Man Card", something we all seem to struggle with and we got together and created each others designs.

Here is mine, based on the Mojo Monday sketch.  I used "Trendy Trees" stamp set for this one, which is quite manly I suppose and teamed with Night of Navy, Chocolate Chip and Old Olive cardstock.  I also added some co-ordinating Designer Series Paper from the Hostess Paper Pack which is of course not available to purchase, only available as a Hostess Gift when you hold a Home Workshop. 

If you are interested in hosting a Home Workshop, all you need to do is invite a few friends round and I will do the rest, its a great fun evening and you could end up with some lovely free goodies!  Give me a call today for more information on holding a Home Workshop of your own.

My greeting is from "Wow Flowers" and cut out using the Word Window Punch as it fits perfectly inside.


Here are Caroline and Georgina's which are both lovely, these photographs don't do them any justice, so lovely IRL.  Caroline's card was very 3D and Georgina's "Waistcoat" card was superb, just what we need for those man cards.  We all had great fun creating each others cards and I am sure we will be doing something similar very soon!

Thursday, April 8, 2010

Boxed Cards

I love making these little Pizza Style boxes and filling them with cute greeting cards, they make a great little gift.

On this occasion I have used the fabulous "Circle Circus" which comprises of 10 gorgeous stamps.  I used Rose Red teamed with Pretty in Pink and Certainly Celery.  I also used some of the Designer Series Patterns Papers in Rose Red.  The greetings are all from "Sincere Salutations.

It's here....

This post will remain at the top of my blog until 9th April 2010, for more recent posts please scroll down

~~~~

Yes, the new Mini Catalogue is now live, click on the cover to the right and it will take you to the online version!

The new mini runs from 1st April to 30th September and is full of lovely new goodies to play with and over the next few days I will try to showcase some projects created with them.

~~~~

Well we couldn't have a new catalogue without a new offer so here it is, remember this is MY offer, not a Stampin' Up! offer:

Spend £45 (plus s&h) between 1st April and 9th April and choose a free pot of "Shimmer Paint" OR Stampin' Ink Pad of your colour choice.  When placing your order please state your gift choice.

Email me at stampinkerry@aol.com for further details

~~~~

This post will remain at the top of my blog until 9th April 2010, for more recent posts please scroll down


Wednesday, April 7, 2010

I saw these flowers on a card but they were tied at the bottom with thread so I decided to put mine in a vase to be different.  The vase was cut using the Oval Punch and cutting the top part with a circle punch and then snipping the bottom off to make a flat base and I think it works!


So my flowers were created using the Two-step Bird Punch, one of the newly released products from the Mini Catalogue.  They are the "bird wing" part of the punch, assembled in three's to create a flower.  The leaves/stem are also part of the same punch and I have used the "Frost White" Shimmer Paint on these to give them a shimmery finish.  My background is stamped onto the So Saffron layer using the new Very Vintage jumbo wheel and my greeting is "Elegant Thank You", one of the new A La Carte stamps.  I completed my card by adding a length of 1/4" Grosgrain Ribbon in Certainly Celery and tying in a knot at the front.

Monday, April 5, 2010

Getting Together

Every month our team, the "Inkaholics" have a get together where we have time to talk business and then time to play afterwards!  As part of our get together we do card swaps which is great as we come away with several different ideas that could be used as make and takes for our home workshops.

I forgot to take a picture of my swap but I have a very similar one to show you, the only difference being the two roses on either side were replaced with leaves.

The rose buds were created using the new "Two-step Bird" punch from the Mini.  This is the "wing" punched out three times then adhered to look like a rose bud (or tulip if you added a straight stem).  I used the new "Frost White" Shimmer Paint, which I have to say is just gorgeous, to add a glimmer to the rose buds and inked around the edges using a dauber with Rose Red ink.  To get a better view of the lovely background on the Pretty in Pink layer, click on the photo to enlarge the image.  This is the new jumbo wheel called "Very Vintage" and I used the Versa Mark stamp to gived a subtle effect.

The greeting is the new "Elegant Thank You" stamp from the "a la carte" stamp range, this is a group of stamps that are sold as single stamps which is great.  I punched out three circles using the 1/4" Circle Punch and added Crystal Effects to make them shine.

DON'T FORGET, ANY ORDERS OVER £45 (BEFORE P&P) PLACED BEFORE 9TH APRIL 2010 WILL QUALIFY FOR A FREE, YES FREE INK PAD OR SHIMMER PAINT OF YOUR CHOICE.

Saturday, April 3, 2010

New Beginnings

I spent an evening last week with a group of ladies and one young gentleman introducing them to card making and the wonderful world of Stampin' Up!  I was inspired on this one by a swap I had received at a recent team meeting, thank you Ruby for the inspiration.  Here it is:


We used Ruby Red ink teamed with Pretty in Pink, Ruby Red, Certainly Celery and Whipser White cardstock.  Our background was stamped using the "So Swirly" jumbo wheel with the Stampin' Around Jumbo Handle and the stamp for the centre of the card was from "Say it with Scallops".  This of course co-ordinates with the Scallop Square punch.  We used the Scallop Edge Border punch to create the Certainly Celery decorative square and threaded 5/8" grosgrain ribbon through the punched out sections and adhered on the reverse.  Some of us placed a brad from the "Hodgepodge Hardware" embellishment kit over the wording "hi"as shown in the photo above and some chose to have the wording revealed.  Our greeting is from "Sincere Salutations" which was cut out and layered using the Oval and Scallop Oval Punches.  We decorated our insert using the wheel.

I hope you all enjoyed your evening of crafting and I look forward to meeting you all again soon and of course if you have any questions regarding the products we used, feel free to email or call me for more information.

Friday, April 2, 2010

Scrapbook Class Layout No. 3

The final layout for this month's class uses three photographs all trimmed down to 4" x 3 3/4" from 6x4" prints.

My titles are mounted onto stamped images from "Frames with a Flourish" set and I also used one of the frame stamps to stamp a pattern onto the hand cut flowers.  I have edited the photos by covering up some flesh for the blog pictures!

I printed my wording and date onto Whisper White Cardstock and punched them out using the Word Window Punch.


Thursday, April 1, 2010

Scrapbooking Class 2nd Layout

Have finally finished the second layout, hope you like it, very feminine this time, lots of pink and flowers!!  Once again the Designer Series Papers are "Tea Party" and I added some Rose Red cardstock which I think works well.

The background is stamped using one of the stamps from "Trendy Trees" with Pretty in Pink ink.  I like to distress the edges of paper and also add a few tears here and there.  I have also used the White Gel Pen to add a few finishing "dots" here and there and once again my "Crystal Effects" has come into action, I just love how it gives the effect of a glossy brad in the centre of some of the flowers.

My third layout is also nearly complete so check back later for details.