Tuesday, June 29, 2010

Scallop Circle Album Class

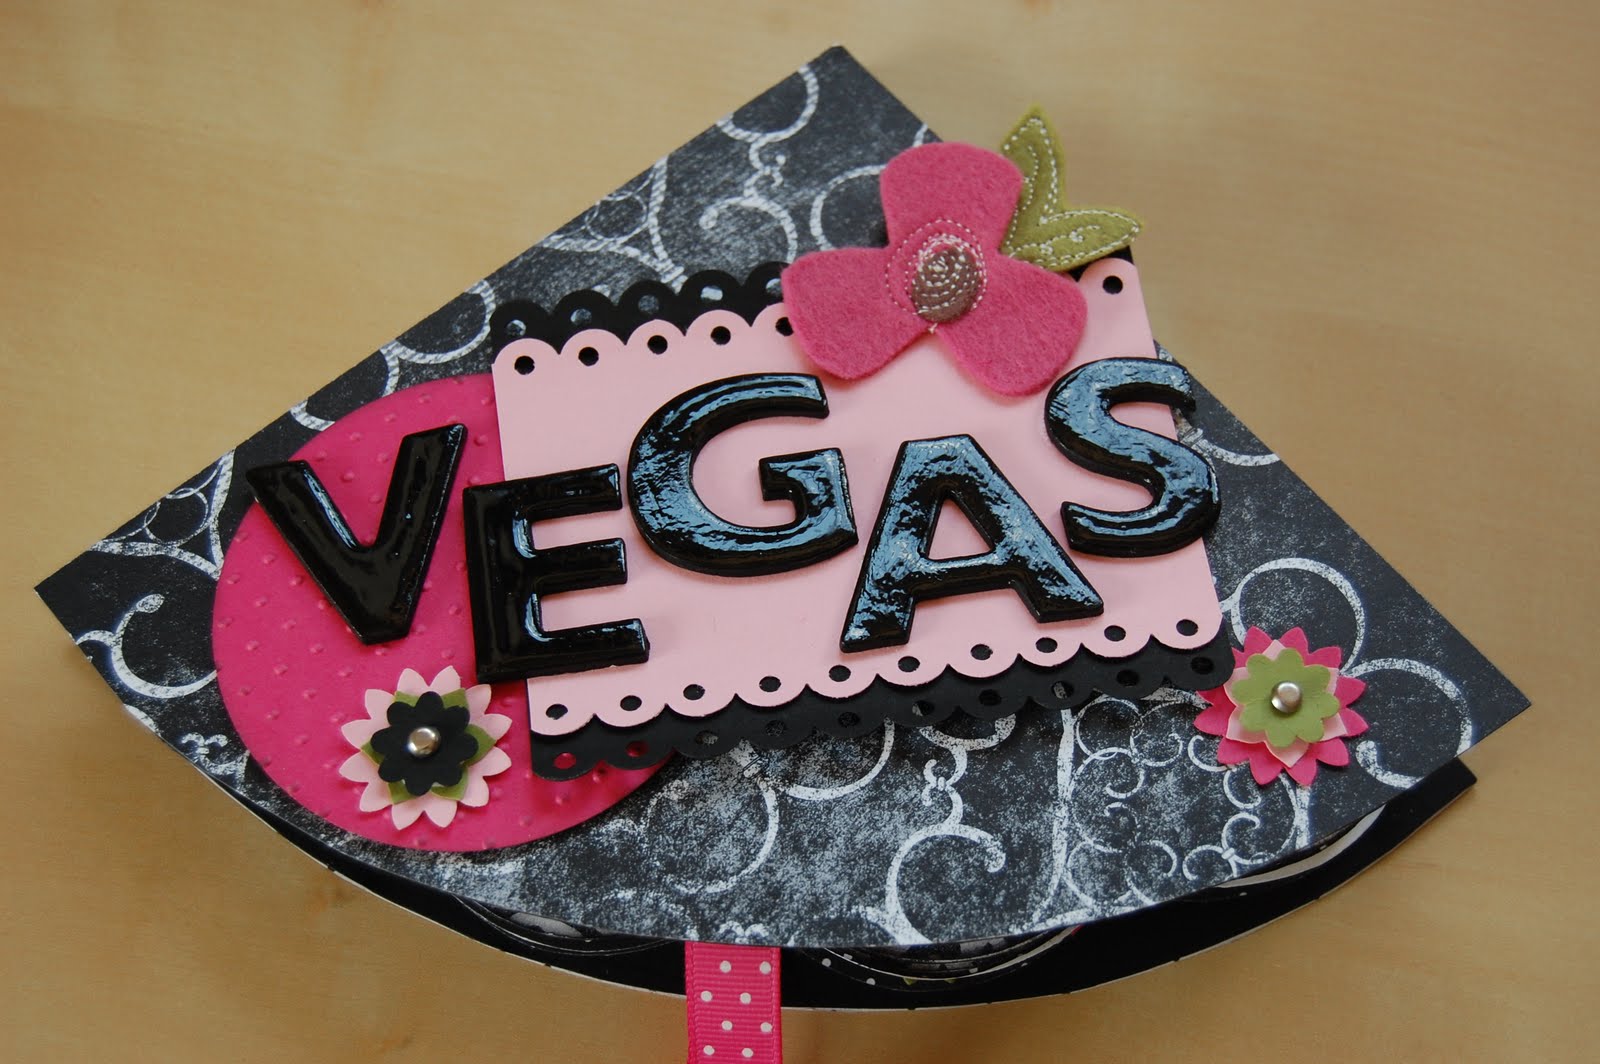
So here is the finished product that we created at last night's class.  We used the "Night and Day" Speciality Designer Series Paper which you can find in the Mini Catalogue.  It really is a gorgeous set of 12 x 12 papers, you also get two sheets of Spotty Window Sheets too!  I teamed the papers with Melon Mambo, a little Pretty in Pink and some Old Olive, all to match in with the Sweet Pea Stitched Felt accents that we were using.
Here is what it looks like once opened up, the first page:


and the second page:

We used the Scallop and Eyelet Border Punches and also the Boho Blossoms and 5 Petal Punches to create our flowers.

For the cover we used the "On Board Loads of Letter" Chipboard letters, daubered them with Basic Black Ink and covered them in Crystal Effects, which created a really stunning finish.

It was quite a lot to fit into an evening class but well worth it in the end!  I hope those of you who came along enjoyed it.

Monday, June 28, 2010

Sneak Peak - Scallop Circle Album

Here's a sneak peak of what we are making at tonight's scrapbooking class, its a Scallop Circle Album, designed by a very talented lady called Cleo Jarvis from the world of scrapbooking.  I made one of these about a year ago and decided to have a go at re-doing one using only Stampin' Up! supplies of course.  Without a template it took me a while but I got there in the end and I am really pleased with the final result!

Check back later for more details and photographs and if you like what you see, maybe I will run another class if I can get enough people interested!


Friday, June 25, 2010

Don't delay, book your space today!

THIS POST WILL REMAIN AT THE TOP OF MY BLOG UNTIL 25TH JUNE, FOR MORE RECENT POSTS PLEASE SCROLL DOWN

Would you like to join us....


Booking is essential and spaces are limited
so to secure your place you need to either register here http://events.constantcontact.com/register/event?oeidk=a07e2x4kbdyfe5fbbfd
or email me at stampinkerry@aol.com for further details and a booking form.

Your place will be secured once your payment has been received and places are given on a first come first served basis so don't delay, get booked today!

THIS POST WILL REMAIN AT THE TOP OF MY BLOG UNTIL 25TH JUNE, FOR MORE RECENT POSTS PLEASE SCROLL DOWN

So addictive!

It's true, these little bird houses are so addictive to make, I keep trying them in different colours and they are just so sweet.  The perfect little gift!

For this one I used some of the So Saffron Patterns Designer Paper and these packs are just so versatile.  You get 12 sheets of patterned paper which are all double sided and all in one colour way.  My dotty window is created using the Dot, Dot, Dot stamp using Stazon Ink onto the Window Sheets.

I am starting a new class over at Thornbury on 5th July called "Making Cards & Gifts" and these little bird houses are on the agenda for one of the forthcoming classes, so if you fancy making one for yourself, just drop me an email to book your place today.  You can get me on stampinkerry@aol.com

Tuesday, June 22, 2010

I had a busy week last week with classes/workshops so didn't really get much time for being creative but I did need to make yet another thank you card.  What lovely colours these are, Rich Razzleberry, Pale Plum and Certainly Celery, mmmmm!

I have been using the "Flight of the Butterfly" set for my demonstrations at this month's home workshops so decided to use it while I had it out.  I used the co-ordinating Butterfly punch and added a Designer Button to the centre of the stamped butterfly.  I couldn't resist the Polka Dot ribbon tied in a knot to blend in with the "Cottage Garden" DSP I used.  My greeting is from "Sincere Salutations".


Sorry for the brief post, I am busy planning for the Extravaganza, places are now slipping away so if you are interested in coming along, don't delay, get yourself booked before you miss out.

Thanks for stopping by 

Saturday, June 19, 2010

Thanks so much

I always appreciate the efforts that my hostess' put into their SU Parties and what better way to say thank you than by sending a hand stamped card.
This design was taken from the current catalogue, just tweeked it a little and I realised that I just don't use "Trendy Trees" enough as it is so versatile.

Once again, my fave colours, Chocolate Chip, Rose Red and Old Olive.  I used the Die Cut "Blooms" to draw around as a template to create my Rose Red 5 Petal Flower and added an Old Olive brad to the centre.  My greeting is from the wonderful, well used set, "Sincere Salutations".

Friday, June 18, 2010

Card Class Creation

OK, as promised yesterday, here is the second card we created on Monday night, this card was our "Technique Card".  I was inspired on this one from a swap I received from Elaine at the quarterly team meeting in May and decided to move a few things around a bit and finally came up with this.


We used the "Kissing" Technique on the "Flower Accent" stamp, basically you kiss two stamps together, one of them being a solid stamp and one a patterned one which gives s stunning result that can have so many different variations.

Our background was created using the jumbo wheel "Very Vintage" in Apricot Appeal ink.  We added Mellow Moss Taffeta ribbon to this layer and attached to our Mellow Moss base card.  Our "Flower Accent" was hand cut and adhered with punched out flowers from the "Boho Blossom" punch surrounding it.  We also used the "Two step Bird Punch" to punch out a couple of leaf branches from Always Artichoke card.

Our greeting is from "Say it with Scallops" which co-ordinates with the Scallop Square punch and we used different stamps from this set accordingly to suit.

Thursday, June 17, 2010

Whitminster Card Class

Here is the first of our two cards at Whitminster's monthly class.

We used the stamp set "True Friend" and teamed it with Basic Black, Melon Mambo and Whisper White, quite a gorgeous combination and very striking.

We also used some of the Rose Red Patterns Designer Papers which blend perfectly with Melon Mambo and we couldn't use Melon Mambo card & ink without adding some of the Polka Dot matching ribbon!  Our finishing touch was to add Crystal Effects to the 1/4" punched circles, including the one in the centre of the flower on the main panel, a little paper piercing in the corners and voila!

Back tomorrow with our second card.


Tuesday, June 15, 2010

More Thank You's

These "Thank You's" were created using the "Flight of the Butterfly" set and I used the lovely new "Rich Razzleberry" along with Pale Plum.  My DSP is "Cottage Wall", one of the 11 New Products but remember, this pack won't be around for long so if you are liking what you see, you need to be ordering it before it disappears!!

Once again "Tiny Tags" has made an appearance, these tiny little greetings that fit perfectly inside the Medium Jewelery Tag punch are just so sweet and I love them to bits. There are a great variety of them to choose from in this set as it comes complete with 17 stamps and some of them are lovely accents.

My butterfly base is stamped in Pale Plum then using the Stamp-a-ma-jig I stamped the flowers over the top in Rich Razzlebery, then punched the whole thing out with the Butterfly Punch, could it get any easier!
I used the Eyelet Border Punch at the bottom of the card to add some prettiness (is there such a word?!?!).  I used the square scallop punch to create my scalloped rectangle on which the Butterfly sits.


Monday, June 14, 2010

A month of birthdays!

It seems to be one of those months where everyone is having a birthday so I have been spending time making cards for each individual. 
For this particular card I used "True Friend", a really great set that can be used for all sorts of occasions.  The DSP is "Tea Party" so I used the colours from this which are Always Artichoke, Pretty in Pink, Chocolate Chip and Whisper White.  I also used some of the 5/8" Grosgrain Ribbon in Chocolate Chip to match along with a lovely Clear Rhinestone to add a bit of bling to the hand cut flower on the right!


Just a short post today as I have my monthly Card Class at Whitminster this evening and I have lots to prepare so catch you tomorrow and thanks for stopping by.

Wow, great news for all you Hostess' out there!


Extra! Extra! Stampin’ Up! hostesses get extra hostess rewards between 1st June and 31st July, in addition to the already fantastic hostess benefits!

From 1st June-31st July, Stampin’ Up! hostesses can earn an EXTRA £20 to use toward Stampin’ Up! products of their choice when they host a workshop totaling £250 or more in product sales!

This extra benefit is in addition to the standard hostess benefits they receive when they host a workshop. The standard hostess benefits include

•A free 2009-2010 Idea Book & Catalogue worth £4.95, provided by your demonstrator.


•Free products only available to hostesses (with qualifying orders; select from the products on pages 10-14 of the catalogue).

•Free Stampin’ Up! products of your choice.


These hostess rewards are only one benefit of hosting a workshop. When you host a workshop, you also get to spend time with friends and family, as well as learn exciting new crafting techniques and project ideas.

If you would like to book a home workshop, give me a call on 07717 068909 for further details, I only have a couple of dates left for June so don't delay!

Saturday, June 12, 2010

Stamp a Stack

Last week myself and Jane Cutting held a "Stamp a Stack" event in the Stroud area.

Our guests came along and created 12, yes 12 beautiful cards all in one day!  The stamp set we used was "Bird on a Branch" which is one of the new sets in the Mini Catalgoue.  This set was included within the cost of the day and the first thing our guests did upon arrival was mount their set ready for stamping.

Here are our creations:

And some close ups:


We had such a lovely time being creative and what better way to spend a day than being creative with others, having fun and coming home at the end of the day with 12 gorgeous cards and a stamp set too!

Watch this space for an upcoming event on 24th July, a whole day of crafting, learning, being creative and being inspired, not to be missed, and if you can't wait for the details, just email me now at stampinkerry@aol.com for the full facts and a booking form!

Friday, June 11, 2010

Thank You's

Once again I am in need of Thank You cards, and when I am at a loose end, which isn't very often, I make myself a batch of Thank You's to keep me going.

I used one of the stamps from the "True Friend" set and also "Tiny Tags" for the greetings on the punched out tags.  I would normally have used Linen Thread to tie a bow on the tags but it seems to have vanished into thin air so I had to resort to the Silver Elastic Cord which works well.  To notch out the corners on the image layer I used the 1/4" Circle Punch.  These colours, So Saffron, Chocolate Chip and Close to Cocoa really do work well together and on this card I added some of the Patterns Designer Series Paper in co-ordinating So Saffron.  My decorative border was created using the lovely "Eyelet Border Punch".

Wednesday, June 9, 2010

Its a Gift!

These little bird houses are everywhere at the moment, and you can see why, they are just so tweeet!  This is one that I made as a gift at a recent workshop, great for filling with yummy chocolates or sweet treats and great to just say "thank you" in its own simplicity.

I used the "Dot, Dot, Dot" background stamp with Black Stazon ink onto some of the medium window sheets and cut a square large enough to cover the circle behind the birdy, of course you can buy the "Night and Day" Designer Series Paper pack which includes two 12x12" sheets of pre-printed dotty window sheet which you can find in the Mini Catalogue.
My flower is stamped using "Vintage Vogue" and of course my bird and branch are punched out using the "Two step Bird Punch".

Don't forget that by hosting a Stampin' Up! Party during June and July, you can earn yourself an extra £20 worth of products, on top of the usual hostess benefits, what an easy way to watch your collection grow!
Give me a call or email me for more information.

Monday, June 7, 2010

Something Old ....

Yet another sweet but simple wedding card, this time using a couple of the Sale-a-bration sets "Happy Moments" and "Whimsical" Words. 

I love using the Mat Pack with the Paper Piercing Tool to create rows and corners of pierced holes, such a simple yet effective way to embellish your cards.
On this card I stamped the cake on a separate piece of Very Vanilla cardstock and cut out just the cake, leaving the stand behind and then used a Dimensional to raise it on top of the stamped image on the card base.  I added flat back pearls to finish.

Friday, June 4, 2010

Birthday Treat

I needed to gift wrap a stamp set that I was giving to a friend for her birthday, albeit a little late, so I decided on using the lovely Rich Razzleberry cardstock teamed with some Soft Suede.  I stamped the Rich Razzleberry cardstock randomly with a stamp from "Tiny Tags" in Whisper White Craft Ink and I was really pleased with the result, it was so pretty.  I punched a couple of tags using the Tag Punches and adhered a stamed flower from "Vintage Vogue" and tied a knot at the top using the lovely Polka Dot Soft Suede ribbon.

Lou, I hope you liked the stamp set, I had heard you mention that you liked this one ages ago so will be looking forward to seeing your creations made with it!

If you are stuck for a present for a friend, why not treat them to some Stampin' Up! goodies, just give me a call on 07717 068909 for information on my Gift Vouchers or why not have an order delivered direct to their door for just £3.95 shipping and handling, what better gift could anyone want and what a lovely surprise it would be for them!

You can also contact me on stampinkerry@aol.com

Thursday, June 3, 2010

Final Layout

I have hundreds of photographs of my son racing and many
completed layouts of him too but you can never have enough layouts of your children, don't you agree!  This photograph was taken last year at a two day event in Bromyard, Worcestershire and my son finished first overall.

The papers are from "Spiced Cider" and I also used some of the Patterns DSP in Chocolate Chip.  We sanded the edges of the DSP to break each layer up as this shows the white base underneath.  Our title and date frames are stamped using "Framed with Love" which is such a gorgeous set and then hand cut and layered using Dimensionals.  We hand cut a tag shape and added a Jumbo Eyelet at the top using the Cropadile.  We also stamped a star image from the "Nursery Necessities" stamp set and added a Metal Edge Tag with a punched heart from the "Heart to Heart" punch.  I added the letter "J" to mine as Jack's initial and punched a 1 3/4" circle from Old Olive cardstock and adhered onto the Metal Edge Tag.

All in all a pretty simple layout, as we make 3 layouts during our class they can't be too involved, but that's not to say that you can't add on your own extras when you get home!

Wednesday, June 2, 2010

Scrapbooking 2nd Layout

One of the other layouts from tonight's Scrapbooking Class.  The DSP is from "Bella Bleu", not all of the papers are "blue" as you may think, they are actually very gorgeous neutral patterns that would suit many occasions.

We used "Circle Circus" for the stamped images, stamped in Not Quite Navy and Chocolate Chip which we layered on top of each other.  We added some Chocolate Chip Striped Ribbon and brads for texture and used a dauber to ink around all the cardstock edges, including the 12x12 DSP base layer.  The frame is from "Frames with a Flourish", stamped over with the leaf and berry stamp from "A Touch of Nature" and then the word "love" from "Basic Phrases" but of course this could be altered to suit your photograph or could just be used as a label for your date.